LAN Realtek
Sound IDT High Definition Audio
Sound Realtek High Definition Audio
VGA Intel ( 945 / GMA 950 )
VGA Nvidia nForce MCP61 for XP 32bit
VGA Nvidia nForce MCP61 Vista 32bit
Chipset Intel
Chipset Nvidia MCP61 for Vista 32bit
Chipset Nvidia MCP61 for XP 32 bit
Chipset Vista 32bit (VGA LAN IDE) - NVIDIA Windows Chipset Drivers (only support MCP73)
Chipset XP 32bit (VGA LAN IDE) - NVIDIA Windows Chipset Drivers (only support
MCP73)
Chipset XP 64bit (VGA LAN IDE) - NVIDIA Windows Chipset Drivers (only support
MCP73)
Raid - NVIDIA RAID Floppy Image
DriversSound - VIA High Definition Audio Driver
VGA Nvidia-G4x-Win2K_XP
VGA Nvidia-G7x-WinVista32
VGA Nvidia-G7x-WinXP32
Rabu, 20 Januari 2010

Selasa, 06 Oktober 2009
Trik internet Gratis di hape
Trik internet Gratis di hape
Trik ini akan bekerja jika anda memakai opera modif, opera handler, dan aplikasi - aplikasi yg sudah di edit / modif handler
Berikut beberapa trik GRATIS dan QUERY gratisan:
3 ( three )
http server: http://server4.operamini.com:80?wap.three.co.id
kalo pake opmin handler
frontquery: kosong
backquery: ?wap.three.co.id
host wap.three.co.id
===
INDOSAT
Indosat ckp pake koneksi indosatmms Lakukan berulang2, trik ini perlu kesabaran..
Cara lain adalah:
http server: http://wap3g.indosat.com@server4.operamini.com:80/
front query isi dengan :
wap3g.indosat.com
atw pake opera mini khusus indosat yg telah d posting sebelumnya
===
AXIS
pake opmod set servernya dgn http://server.operamini.com:80/@wap.axisworld.co.id
===
XL
pake xl di jawa timur (d beberapa wilayah jg bs berhasil)
Gunakan opmod
- server normal
- shadow centang
- pilih http
- server bwh di isi wap.xl.co.id
port isi 8030 lalu save.
===
untuk melihat dan mengubah settings server pada opmod : buka opmod lalu tekan pagar lalu angka 8 atau klik menu > opsi > pengaturan > jaringan
note: untuk server opmod server.operamini.com sdg opmin pake server4.operamini.com beda diangka 4.
===
Opmod (opera modif) adalah browser yg sangat baik fiturny yg komplit. Copy paste, multi windows, server editor, menager file, fpt dll...
tapi rada jadul.. hehe..
Berikut ini beberapa varian opera mini yang harus anda miliki agar trik INTERNET GRATIS ini berhasil
Opera Mini4.2 Handler:
Opmod :
Trik ini akan bekerja jika anda memakai opera modif, opera handler, dan aplikasi - aplikasi yg sudah di edit / modif handler
Berikut beberapa trik GRATIS dan QUERY gratisan:
3 ( three )
http server: http://server4.operamini.com:80?wap.three.co.id
kalo pake opmin handler
frontquery: kosong
backquery: ?wap.three.co.id
host wap.three.co.id
===
INDOSAT
Indosat ckp pake koneksi indosatmms Lakukan berulang2, trik ini perlu kesabaran..
Cara lain adalah:
http server: http://wap3g.indosat.com@server4.operamini.com:80/
front query isi dengan :
wap3g.indosat.com
atw pake opera mini khusus indosat yg telah d posting sebelumnya
===
AXIS
pake opmod set servernya dgn http://server.operamini.com:80/@wap.axisworld.co.id
===
XL
pake xl di jawa timur (d beberapa wilayah jg bs berhasil)
Gunakan opmod
- server normal
- shadow centang
- pilih http
- server bwh di isi wap.xl.co.id
port isi 8030 lalu save.
===
untuk melihat dan mengubah settings server pada opmod : buka opmod lalu tekan pagar lalu angka 8 atau klik menu > opsi > pengaturan > jaringan
note: untuk server opmod server.operamini.com sdg opmin pake server4.operamini.com beda diangka 4.
===
Opmod (opera modif) adalah browser yg sangat baik fiturny yg komplit. Copy paste, multi windows, server editor, menager file, fpt dll...
tapi rada jadul.. hehe..
Berikut ini beberapa varian opera mini yang harus anda miliki agar trik INTERNET GRATIS ini berhasil
Opera Mini4.2 Handler:
Opmod :
Flashing Bios
You need an USB stick capable of booting DOS. The easiest way to make one is to use Unetbootin. It's available for both Linux and Windows.
1 Linux
Press Alt+F2, check Run in Terminal and click Run to open a terminal.
Select everything like in the screenshot, the drive will be /dev/sdb1 if only one device is connected, and click OK.
1 Windows
Just download the file from here. Select everything like in the screenshot, you may need to adjust the drive letter, and click OK.
2 Extract all files from the BIOS zip file onto the USB drive.
3 Reboot and press F12 to select a bootable device. Choose option 5 when prompted by DOS and ignore the error about a missing CD-ROM. Change to drive C: and if that doesn't work try drive B: instead.
4 Run the batch file to flash the BIOS by simply entering its filename, which is 3310.BAT for the latest BIOS version. The AC adapter must be connected or the flash utility will wait until it is.
5 After successfully flashing the BIOS the AA1 will reboot by itself. A few BIOS settings will be reset to default and might need to be readjusted if you changed them from the default values before.
1 Linux
Press Alt+F2, check Run in Terminal and click Run to open a terminal.
sudo yum install syslinux p7zip-plugins
wget -O unetbootin http://downloads.sourceforge.net/unetbootin/unetbootin-linux-293
chmod 755 unetbootin
sudo ./unetbootin &
Select everything like in the screenshot, the drive will be /dev/sdb1 if only one device is connected, and click OK.
1 Windows
Just download the file from here. Select everything like in the screenshot, you may need to adjust the drive letter, and click OK.
2 Extract all files from the BIOS zip file onto the USB drive.
3 Reboot and press F12 to select a bootable device. Choose option 5 when prompted by DOS and ignore the error about a missing CD-ROM. Change to drive C: and if that doesn't work try drive B: instead.
4 Run the batch file to flash the BIOS by simply entering its filename, which is 3310.BAT for the latest BIOS version. The AC adapter must be connected or the flash utility will wait until it is.
5 After successfully flashing the BIOS the AA1 will reboot by itself. A few BIOS settings will be reset to default and might need to be readjusted if you changed them from the default values before.
Acer Aspire One Bios 3305
You can download it here, release notes are included. As the minor version bump already suggests there are only a few changes. Two of them are battery calibration related, the other one is a fix for the crisis mode which refers to the BIOS recovery routine as described here.
If you have not already prepared a bootable USB stick read how to do so here.
The BIOS is now also available from Acer Japan here. It's only the BIOS file with no tools to actually flash it. Instead Acer Japan uploaded a tool to flash the BIOS from within Windows, available here. It's official so it's probably safe to use.
Acer Taiwan put the BIOS online now as well, available here.
And finally the BIOS has been uploaded to their european server. There is actually a text file included which recommends to flash the BIOS from DOS via a bootable USB stick.
http://macles.blogspot.com/2008/10/acer-aspire-one-bios-v3305.html
1. puter light lights up
2. screen is black
3. insert flash drive w/all 3304 files on it and the flashlight util
4. push fn & esc key
5. push power button
6. release fn/esc key
7. push blinking power button 1 time
8.wait 10 min
If you have not already prepared a bootable USB stick read how to do so here.
The BIOS is now also available from Acer Japan here. It's only the BIOS file with no tools to actually flash it. Instead Acer Japan uploaded a tool to flash the BIOS from within Windows, available here. It's official so it's probably safe to use.
Acer Taiwan put the BIOS online now as well, available here.
And finally the BIOS has been uploaded to their european server. There is actually a text file included which recommends to flash the BIOS from DOS via a bootable USB stick.
http://macles.blogspot.com/2008/10/acer-aspire-one-bios-v3305.html
1. puter light lights up
2. screen is black
3. insert flash drive w/all 3304 files on it and the flashlight util
4. push fn & esc key
5. push power button
6. release fn/esc key
7. push blinking power button 1 time
8.wait 10 min
Kamis, 20 Agustus 2009
Instalasi Ubuntu 8.04 Hardy Herdon
Berikut tutorial yang dibuat secara sederhana, seadanya dan sebisanya 
1. Siapkan CD / INSTALLER UBUNTU 8.04 Hardy Herdon
Cara mendapatkannya bisa langsung mendownload disini atau yang tidak mempunyai bandwidth lebih untuk men-download silahkan minta cdnya disini tetapi harus bersabar dan menunggu lebih lama lagi.
2. Installasi bisa melalui Windows atau Booting CD
Akan saya bahas disini Proses installasi melalui Windows
Proses installasi ini layaknya menginstall aplikasi biasa di windows yang sewaktu-waktu bisa anda Uninstall kalau mau berpaling lagi ke windows
- Masukan CD/Mount ISO Ubuntu 8.04
- Akan keluar tampilan seperti ini

Anda bisa memilih Install Inside Windows setelah itu tentukan dimana anda akan meng-installkan Ubuntu

Tekan install dan proses instalasi akan berjalan

Setelah selesai proses installasi selesai akan Reboot.
3. Yupppiiieee…. sekarang anda bisa langsung menikmati Ubuntu Hardy Herdon.

Mudahkan instalasi Linux ?? GO OPENSOURCE !!
Telepon Gratis dari Laptop
Telepon GRATIS kemana saja, langsung dari Laptop/PC kamu.
Caranya : cukup register dan install software kamu bisa telepon kemana saja (HP, Telepon Rumah, dll) Lokal ataupun Internasional.
Tertarik ingin mencoba ?
Aplikasi ini sudah dicoba ke beberapa operator lokal di Indonesia dan juga telepon rumah, semua menunjukan hasil yang cukup memuaskan dan suara yang cukup jernih walaupun terjadi delay beberapa detik saja.
Aplikasi ini mirip sekali dengan VOIP - Y!M Voice - Skype dan VoxOx memungkinkan Anda melakukan panggilan suara dan video dari PC ke berbagai perangkat seperti PC, ponsel - dengan nomor telepon, dll.
Cara Instalasi :
1. Sebelum anda melakukan instalasi sebaiknya anda men-download dulu aplikasi tersebut yang berkapasitas 25MB : Download VoxOx
2. Setelah anda selesai Download - Install aplikasi tersebut
3. Anda bisa mendaftar langsung setelah selesai Download, Pilih Sign Up for a Username

4. Silahkan anda Login sesuai dengan Username dan Password yang sudah anda daftarkan

4. Setelah semua proses login selesai akan masuk ke tampilan berikut ini

Perhatikan sudut kanan atas ada tertulis $V 120 (itu merupakan pulsa anda)
kalau habis bagaimana ? Silahkan membuatnya lagi
5. Bagaimana cara menggunakannya ? sampai bisa digunakan untuk menelpon

- Pilih Keypad
- Select your country you are dialing - Pilih Indonesia
- Tekan no Tujuan yang ingin anda hubungi
- Tekan tombol bergambar telepon
6. Akan muncul gambar seperti dibawah ini, setelah selesai tunggu beberapa saat

- Terdapat tulisan Ringing 0116221xxxxxxx dan tunggu beberapa saat, Anda akan mendengarkan bunyi dari Telepon Rumah, HP Anda.
- Tekan Hang Up untuk menutup telepon
Silahkan anda mencoba dan mengutak-atik sendiri, siapa tau anda menemukan fitur-fitur lainnya. Saya sudah mencoba aplikasi ini untuk dikoneksikan dengan Y!M, Facebook, dll.
Selamat Mencoba 
Tidak lupa saya ucapkan Terima Kasih kepada mamin86 - Kaskuser yang sudah memberikan informasi ini, berikut adalah Original Post-nya : hari gini bisa telpon gratis tanpa biaya ke seluruh dunia
Terima Kasih juga saya ucapkan untuk teman-teman Kaskuser lainnya yang sudah ikut mencobanya.

Thanks : JoybookHolic @ KASKUS
Bios Update MSI Wind U100
BIOS UPDATE for MSI Wind

| BIOS Type | AMI BIOS | File Size | 817KB |
|---|---|---|---|
| Version | 1.09 | Update Date | 2008-10-22 |
| Description | Update BIOS | ||
| Download | n011_109.zip | ||
Published on : EV
EV’s Guide to Flashing the 1.09 Bios for the MSI Wind in Windows XP and Vista
CAUTION: Although this method is proven to be the most successfully consistent, its not a surefire method and those not willing to take the technical risk of temporarily or permanently screwing up their machine should not proceed.
However, this is an official MSI release available on their website and therefore they legally must support any issues you have with the upgrade. Thanks MSI!
Step 1 ) As flashing the bios is an inherently risky procedure it is important that you are running on AC power and that your MSI Wind battery is removed to prevent any potential power issues during the update. Shut Down your Wind, remove the battery, and boot to Windows on wall power only.
Step 2 ) Download this package which contains the 1.09 official bios, and a modified version of the winflash utility for flashing your bios in Windows.
Step 3 ) To be safe turn off Wi-Fi and Bluetooth and disconnect all peripherals from your Wind. Close any virus scanners or 3rd party firewalls that might inadvertently interrupt or cause errors during the bios flashing process. Program your power button to shut down the machine (rather than standby or hibernate).
Step 4 ) Unzip the package and create a folder in your C Drive called FLASH. Paste the files from the downloaded package into the FLASH folder.
Step 5 ) Click the Start button, click Run… and type CMD and press OK. This will launch a DOS-like command prompt in a window. Type CD\ at the prompt to return to the core directory and then type CD FLASH to change to the C:\FLASH directory. Type RUNFLASH to execute the batch file that will update your Bios. Wait patiently for the flash to complete. Once done you will be back at the command prompt in C:\FLASH. Type EXIT. If your keyboard is not working at this stage don’t panic, just shut down your computer using your mouse or press your power button.
Step 6 ) Shut Down your machine and remove the wallpower for 20 seconds.
Step 7 ) Reinstall the battery and boot your machine to Windows ensuring USB, Wi-Fi, Bluetooth, Keyboard and Mouse are all functioning. Refer Troubleshooting at the end of this guide if you experience issues during this step. If your computer doesn’t boot at all (won’t displya bios flash screen) and you have additional RAM see the troubleshooting section.
Step 8 ) Reboot your Wind and enter your bios (Press DEL when you see the MSI splash screen) - navigate to the Advanced tab and where it says DOC you can select between an 8%, 15% and 24% overclock. Also make sure Speedstep is set to Enabled as this will allow your Atom to run at a lower clock when idling.
I advise starting DOC with 8% to make sure that your Wind can handle this overclock and work your way up to 24% (1984MHz c.f. 1600MHz stock) if you wish. Users with upgraded good quality RAM (such as Corsair) will be able to achieve a higher overclock setting with stable results.
Press F10 to save and exit the bios.
Once in Windows, and running on AC Power, pressing Fn+F10 should display ‘Turbo On’ and your Power LED should turn Orange. You are now running an overclocked Wind!
Note: As an added bonus when running on Battery Power and pressing Fn+F10 for Eco Mode you power LED will turn green. So now you can tell whether you are in Eco, Normal or Turbo modes just by looking the power LED color!
Troubleshooting:
- If your Wind doesn’t boot try disconnecting all power sources (battery, wallpower) for 20 seconds or holding down the Power button for 10 seconds with AC Power connected.
- If you have additional RAM you need to disable Onboard Memory in the bios. You can display the bios splash screen by holding down Esc and pressing the power on button. You will still need to press Del once you see the MSI splash screen. Alternatively try removing the additional RAM module and booting into the bios (press DEL when the MSI splash screen appears). In the Advanced tab ensure that Onboard Memory is disabled then reinstall your additional RAM and reboot.
- Try enabling/disabling AHCI in bios.
- If you don’t see the ‘Turbo On’ icon (as per the pic in this post, except without a fast looking mouse) then you probably need to install the System Control Manager from MSI’s support site here.
- Refer MSI Wind Forums if these methods don’t work.
Senin, 27 Juli 2009
Macrium Reflect
Untuk para pengguna Acer Aspire One, pada artikel sebelumnya saya sudah menjelaskan bagaimana cara untuk melakukan backup pada partisi PQSERVICE menggunakan software Macrium Reflect.
Kali ini, saya akan menjelaskan cara untuk melakukan recovery dari file backup yang sudah dibuat. Sebenarnya langkah ini tidak terbatas hanya utk backup dari PQSERVICE saja, tapi seluruh backup yang dilakukan dengan software Macrium Reflect bisa direstore dengan langkah ini.
Meski basis dari Rescue CD ini adalah linux, tapi tidak usah takut, karena tampilannya sudah diganti seperti Windows dan udah mengenali mouse secara otomatis.
Acer memiliki file MBR khusus yang apabila pada saat startup anda menekan Alt+F10, maka sistem akan membawa anda ke mode recovery yg memanggil file dari partisi PQSERVICE. Karena itu, jika anda mengganti OS tanpa membackup terlebih dahulu file MBR anda, dipastikan anda tidak bisa memanggil Alt+F10 dari proses startup.
Untuk backup MBR, ada beberapa file yang disarankan yaitu
- MBRWizard (http://mbrwizard.com/download.shtml)
- MBRTool (http://www.diydatarecovery.nl/download/MBRTool_Setup.exe)
- MbrFix (http://www.sysint.no/Nedlasting/MbrFix.zip)
- MBRUtil (ftp://ftp.symantec.com/public/english_us_canada/tools/pq/utilities/head.zip)
- HDHacker (http://dimio.altervista.org/stats/download.php?id=6)
Setelah download, lakukan backup pada MBR anda. Untuk cara backup, silahkan baca referensi pada website diatas masing-masing.
Bisa dikatakan, bahwa langkah ini adalah langkah terpenting dalam proses ini. Sebenarnya banyak sekali aplikasi yang bisa membaca partisi tersembunyi, tapi saya menemukan aplikasi (edisi gratis) dengan nama Macrium Reflect (http://www.macrium.com/reflectfree.asp). Aplikasi ini tergolong bagus, karena selain bisa mendeteksi adanya partisi tersembunyi, juga bisa utk backup, restorasi. Bahkan secara otomatis, aplikasi ini akan membackup MBR pada saat prosesnya.
Activate Acer Hidden Partition / PQ SERVICE
Note: If you have Empowering Backup installed please burn the Disk Images before continuing as it is always good to have fall backs
The story goes:
Alternatively you can do this
The story goes:
You heard that Vista is slow and lousy so you have decided to "downgrade" to Windows Xp
So you happily install Xp and delete the original system partition and install a new Xp partition
However you smartly left the recovery partition intact.
A few week later you suddenly felt like trying out Vista
However to your horror you couldn't
You tried the famous Alt-F10 to activate Acer Disk to Disk Recovery (D2D) but it doesn't work although the recovery partition is fully intact
You wonder why?
The reason is the original boot record has been overwritten by the Windows Xp you installed over the special original Acer/Vista one so there is no way the boot record will activate recovery.
So I will show you how to activate the Recovery Partition in a few simple steps:
Before you proceed make sure you backup all your important data first
Step 1:
Download PTEDIT32 from here
PTEDIT is a special disk utility to re-mark partition to another type so it becomes bootable
(It should work on all 32bit Windows OS I did not try it on a 64bit Windows)
Step 2:
Extract it to a folder and Right Click run it with Administrator Permission otherwise it will not run (Xp users ignore the right click)
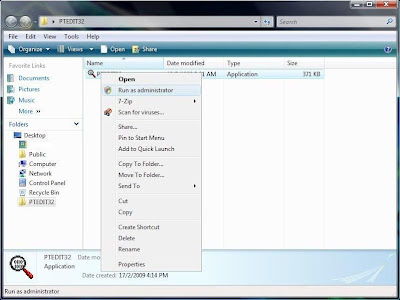
Step 3:
Look at the first entry that is your hidden partition PROVIDED YOU DID NOT ACCIDENTALLY DELETE IT if you did, I recommend you look here instead.
To double confirm check the size make sure it is small like the screenshot
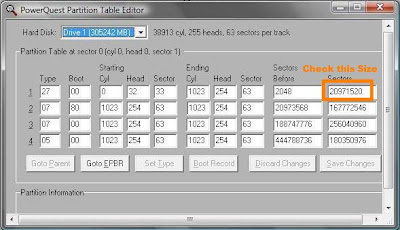
Step 4:
Change the partition type to 07 from 27 (If the partition type is of another value, change to the same type as your system disk C:\)
Then make the changes.Reboot to take effect.
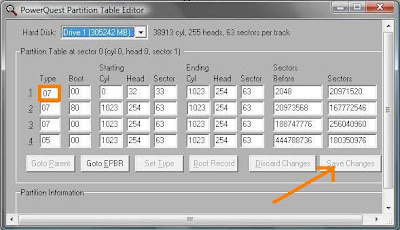
Step 5:
Open Control Panel>> Administrative Tools>> Computer Management>> Disk Management
Step 6:
Mark the partition as Active
Then Reboot disk recovery will start automatically
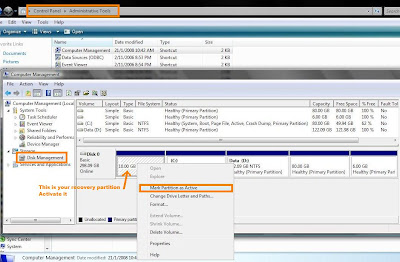
Please remember to burn a copy of the factory default image and driver disk as a backup after that using Empowering Backup, if you haven't already done so.
So you happily install Xp and delete the original system partition and install a new Xp partition
However you smartly left the recovery partition intact.
A few week later you suddenly felt like trying out Vista
However to your horror you couldn't
You tried the famous Alt-F10 to activate Acer Disk to Disk Recovery (D2D) but it doesn't work although the recovery partition is fully intact
You wonder why?
The reason is the original boot record has been overwritten by the Windows Xp you installed over the special original Acer/Vista one so there is no way the boot record will activate recovery.
So I will show you how to activate the Recovery Partition in a few simple steps:
Before you proceed make sure you backup all your important data first
Step 1:
Download PTEDIT32 from here
PTEDIT is a special disk utility to re-mark partition to another type so it becomes bootable
(It should work on all 32bit Windows OS I did not try it on a 64bit Windows)
Step 2:
Extract it to a folder and Right Click run it with Administrator Permission otherwise it will not run (Xp users ignore the right click)

Step 3:
Look at the first entry that is your hidden partition PROVIDED YOU DID NOT ACCIDENTALLY DELETE IT if you did, I recommend you look here instead.
To double confirm check the size make sure it is small like the screenshot

Step 4:
Change the partition type to 07 from 27 (If the partition type is of another value, change to the same type as your system disk C:\)
Then make the changes.Reboot to take effect.

Step 5:
Open Control Panel>> Administrative Tools>> Computer Management>> Disk Management
Step 6:
Mark the partition as Active
Then Reboot disk recovery will start automatically

Please remember to burn a copy of the factory default image and driver disk as a backup after that using Empowering Backup, if you haven't already done so.
Using a command line
- Open Command Prompt. (Right Click "Run As Administrator" For Vista)
- Type:
- diskpart
- At the DISKPART prompt, type:
- list disk
- At the DISKPART prompt, type:
- select disk n (In this case it is disk 0)
- At the DISKPART prompt, type:
- list partition Make note of the number of the partition that you want to mark as active.
- At the DISKPART prompt, type:
- select partition n (In this case it is partition 1)
- At the DISKPART prompt, type:
- active
Kamis, 16 Juli 2009
Bios CQ40 Untuk Windows Xp
Yang punya Compaq CQ40 n mau diinstall Xp silahkan downgrade dulu biosnya biar ga ada problem waktu instalasi drivernya ( biasanya audio ama modem )
DOWNLOAD >>>
Biasanya bios lamannya versi F.31 E downgrade dengan versi ini F.11 E
DOWNLOAD >>>
Biasanya bios lamannya versi F.31 E downgrade dengan versi ini F.11 E
Sabtu, 11 Juli 2009
Buat Download Rapidshare dkk
Buat temen2 kaum downloader semua ini aq kasih link tool yang dipakai buat download rapidshare dkk.. Nama toolnx US Downloader..g perlu ribet n install segala.klo suka / berminat silahkan dipake aja..
DOWNLOAD >>>>
DOWNLOAD >>>>
Kamis, 09 Juli 2009
Mengembalikan Setting Exporer Windows dengan Trojan Remover
Bagi anda yang sering berkutat dengan virus, ini ada tool yang cukup ampuh untuk mengembalikan setting explorer pada windows. Selain itu juga cukup ampuh juga untuk trojan trojan
Langsung download aja toolnya disini
Setelah download install sesuai dengan readme nya.klo minta restart, restart aja.klo g salah dia minta restart sampai 3x jika explorer kita terjangkiti virus or trojan
semoga bisa membantu permasalahan seperti folder option yang tiap di setting show hidden file balik lagi ke don't show hidden file setelah di apply
Langsung download aja toolnya disini
Setelah download install sesuai dengan readme nya.klo minta restart, restart aja.klo g salah dia minta restart sampai 3x jika explorer kita terjangkiti virus or trojan
semoga bisa membantu permasalahan seperti folder option yang tiap di setting show hidden file balik lagi ke don't show hidden file setelah di apply
Problem Audio pada Compaq CQ40
Download Devcon.exe dan jalankan
Akan terbentuk 3 file : i386, i64, EULA
Copy kan devcon yang ada pada folder i386 ke system32
Buka cmd dan ketik : devcon find pci*
Arahkan pada baris Microsoft UAA Bus for High Definition Audio “PCI\VEN_8086&DEV_293E&SUBSYS_3607103C&REV_03“
Copy Alamat tersebut dengan cara klik kanan pada alamat tsb-->Mark, Blok alamat tadi, setelah terblok semua tekan CTRL + C.
Buka Notepad
Tekan CTRL + V untuk paste
Tambahkan DEVCON.EXE RESTART sebelum quota sehingga menjadi spt dibawah ini.
Kalau anda kesulitan membuatnya bisa download disini
Download audiopatch dan extract satu folder dengan devcon.exe pada system32
klik kanan pada audiopatch.bat dan send to desktop
Copy hasil shortcut di desktop dan pastekan di Windows --> All Program--> start-up
Akan terbentuk 3 file : i386, i64, EULA
Copy kan devcon yang ada pada folder i386 ke system32
Buka cmd dan ketik : devcon find pci*
Arahkan pada baris Microsoft UAA Bus for High Definition Audio “PCI\VEN_8086&DEV_293E&SUBSYS_3607103C&REV_03“
Copy Alamat tersebut dengan cara klik kanan pada alamat tsb-->Mark, Blok alamat tadi, setelah terblok semua tekan CTRL + C.
Buka Notepad
Tekan CTRL + V untuk paste
Tambahkan DEVCON.EXE RESTART sebelum quota sehingga menjadi spt dibawah ini.
DEVCON.EXE RESTART “PCI\VEN_8086&DEV_293E&SUBSYS_3607103C&REV_03“
simpan dengan nama audiopatch.batKalau anda kesulitan membuatnya bisa download disini
Download audiopatch dan extract satu folder dengan devcon.exe pada system32
klik kanan pada audiopatch.bat dan send to desktop
Copy hasil shortcut di desktop dan pastekan di Windows --> All Program--> start-up
Senin, 06 Juli 2009
Mengenal Siapa Diri Sejati Kita
Para pembaca yang budiman,
Selama kita hidup di dunia ini sudahkah kita mengenal diri sejati kita...
sebab ini sangatlah penting dikarenakan sebelum kita mengenal orang lain, mengenal lingkungan, mengenal alam, bahkan mengenal Tuhan kita seyogyanya sudah mengenal siapa diri kita sebenarnya..
Lalu pertanyaannya sudahkah kita mengenal diri kita.
dan siapa sebenarnya diri sejati kita?
Apakah diri kita itu adalah sosok berwujud yang berupa tangan, kaki, badan dsb. yang tampak waktu kita berada didepan cermin.Mungkin jawaban tersebut sangat tepat bila kita lihat dari segi ilmu biologi.tapi apakah wujud yang tampak didepan cermin tadi sudah bisa dikatakan diri kita yang sebenarnya / sejati??
Kita hidup di alam dunia ini ibarat kita melakukan perjalanan dari satu kota ke kota yang lain..
anggap saja kita sedang berada di kota dunia..
di kota ini kita dipinjami motor oleh tuhan yaitu berupa badan/jasmani kita.stang berupa tangan, roda berupa kaki,tangki berupa perut, lampu berupa mata, bensin berupa nafas dsb.
dari analogi singkat tersebut tentu kita sudah bisa menebak bahwa wujud yang ada didepan cermin yang kita lihat tadi ternyata belum cukup untuk dikatakan diri sejati kita.
jadi apa yang kurang? dan siapa sebenarnya diri kita?
mari kita renungkan..
Seonggok motor yang ada didepan cermin tadi tidak akan mampu berjalan dan berfungsi klo tidak ada sang pengemudi. Sang pengemudi inilah yang nantinya sangat berpengaruh dalam memakai motor tadi. Dia mau jalan ditempat yang gelap atau terang, dia mau tertib aturan lalu lintas atau justru melanggarnya, semua tergantung dari sang pengemudi motor tadi. Jadi justru diri sejati kita sebenarnya terletak pada sang pengemudi motor tadi. Sudahkah mengenal sang pengemudi tadi, pengemudi dari motor yang tidak lain adalah pengemudi raga kita??
Penulis tidak ingin menggurui pembaca yang budiman karena penulis hanyalah orang yang penuh dengan kekurangan dan khilaf dan juga berstatus masih mencari siapa pengemudi dari raga penulis.
Maka carilah tahu siapa sebenarnya diri kita. Kalau ada dari pembaca yang budiman sudah tahu tentang diri sejatinya dan mungkin tahu tips tips untuk mengenal diri sejati kita silahkan di-share disini.
Mudah-mudahan kita segera tahu dan mengenal diri kita karena setelah kita tahu siapa diri kita yang sesungguhnya insya allah kita akan bisa mengenal siapa yang menciptakan kita (Yang menciptakan motor dan pengemudinya), Ciptaan ciptaan-Nya yang lain (Alam Semesta dan Isinya), Lingkungan, dan yang terpenting adalah makna hidup kita. Amien....
Selama kita hidup di dunia ini sudahkah kita mengenal diri sejati kita...
sebab ini sangatlah penting dikarenakan sebelum kita mengenal orang lain, mengenal lingkungan, mengenal alam, bahkan mengenal Tuhan kita seyogyanya sudah mengenal siapa diri kita sebenarnya..
Lalu pertanyaannya sudahkah kita mengenal diri kita.
dan siapa sebenarnya diri sejati kita?
Apakah diri kita itu adalah sosok berwujud yang berupa tangan, kaki, badan dsb. yang tampak waktu kita berada didepan cermin.Mungkin jawaban tersebut sangat tepat bila kita lihat dari segi ilmu biologi.tapi apakah wujud yang tampak didepan cermin tadi sudah bisa dikatakan diri kita yang sebenarnya / sejati??
Kita hidup di alam dunia ini ibarat kita melakukan perjalanan dari satu kota ke kota yang lain..
anggap saja kita sedang berada di kota dunia..
di kota ini kita dipinjami motor oleh tuhan yaitu berupa badan/jasmani kita.stang berupa tangan, roda berupa kaki,tangki berupa perut, lampu berupa mata, bensin berupa nafas dsb.
dari analogi singkat tersebut tentu kita sudah bisa menebak bahwa wujud yang ada didepan cermin yang kita lihat tadi ternyata belum cukup untuk dikatakan diri sejati kita.
jadi apa yang kurang? dan siapa sebenarnya diri kita?
mari kita renungkan..
Seonggok motor yang ada didepan cermin tadi tidak akan mampu berjalan dan berfungsi klo tidak ada sang pengemudi. Sang pengemudi inilah yang nantinya sangat berpengaruh dalam memakai motor tadi. Dia mau jalan ditempat yang gelap atau terang, dia mau tertib aturan lalu lintas atau justru melanggarnya, semua tergantung dari sang pengemudi motor tadi. Jadi justru diri sejati kita sebenarnya terletak pada sang pengemudi motor tadi. Sudahkah mengenal sang pengemudi tadi, pengemudi dari motor yang tidak lain adalah pengemudi raga kita??
Penulis tidak ingin menggurui pembaca yang budiman karena penulis hanyalah orang yang penuh dengan kekurangan dan khilaf dan juga berstatus masih mencari siapa pengemudi dari raga penulis.
Maka carilah tahu siapa sebenarnya diri kita. Kalau ada dari pembaca yang budiman sudah tahu tentang diri sejatinya dan mungkin tahu tips tips untuk mengenal diri sejati kita silahkan di-share disini.
Mudah-mudahan kita segera tahu dan mengenal diri kita karena setelah kita tahu siapa diri kita yang sesungguhnya insya allah kita akan bisa mengenal siapa yang menciptakan kita (Yang menciptakan motor dan pengemudinya), Ciptaan ciptaan-Nya yang lain (Alam Semesta dan Isinya), Lingkungan, dan yang terpenting adalah makna hidup kita. Amien....
Rabu, 10 Juni 2009
Belajar Bikin Aplikasi J2ME
Artikel ini menjelaskan tentang cara memulai membuat aplikasi J2ME (aplikasi Java untuk perangkat kecil, seperti selular, PDA dan lainnya) tanpa menuliskan kode kode programming (source-code) sedikitpun, karena artikel ini ditujukan kepada programmer yang belum pernah membuat aplikasi J2ME, banyak para programmer desktop PC yang mungkin merasa terlalu susah untuk bikin aplikasi J2ME untuk selular, mudah mudahan artikel singkat ini bisa memberikan penjelasan yang cukup dan memberikan semangat yang positif untuk memulai membuat aplikasi J2ME.
Membuat aplikasi J2ME tidak memerlukan banyak software yang rumit atau besar, salah satu software yang pasti diperlukan adalah J2SE SDK/JDK, dalam J2SE SDK/JDK ini terdapat runtime dan library untuk program Java secara umum termasuk juga untuk J2ME, pada saat artikel ini ditulis telah ada J2SE SDK v1.4.2.
Untuk menulis source-code J2ME, maka kita memerlukan sebuah J2ME IDE (integrated development environment),
ada beberapa pilihan IDE yang diantaranya adalah Netbean, Sun One Java Studio Mobility, CodeWarrior dan notepad (atau text editor lainnya), untungnya semua software IDE yang disebutkan ini dapat di download gratis di website resmi masing masing perusahaan, jadi untuk membuat program J2ME maka pihak developer tidak perlu mengeluarkan uang sama sekali untuk membeli software IDE.
Pada artikel ini yang diulas adalah IDE dari Netbean v4.1 dengan tambahan Netbean Mobility Pack v4.1, tambahan ini diperlukan untuk membuat aplikasi J2ME, karena jika hanya dengan Netbean v4.1 hanya dapat membuat aplikasi Java saja, Netbean Mobility Pack adalah module-module aplikasi J2ME dan emulator device untuk testing dalam PC. IDE lainnya boleh dicoba tapi dianjurkan memakai Netbean v4.1 karena versi ini sangat mudah dioperasikan dan dirasakan cukup cepat dibanding IDE lainnya dalam hal loading, compiling, running dan debugging.
Langkah yang dilakukan oleh editor untuk memulai pembuatan aplikasi J2ME adalah:
1. Install J2SE SDK v1.4.2 (50MB)
2. Install Netbean v4.1 (47MB)
3. Install Netbean Mobility Pack v4.1 (18MB)
4. Jalankan Netbean v4.1, buat projek baru dan pilih kategori "Mobile" dan tipe projek "Mobile Application"
5. Pilih lokasi tempat menyimpan file-file projek ini, "Set as Main Project" dan "Create Hello MIDlet" jangan dirubah (tercentang)
6. Pada halaman "Platform selection" pilih "Device Configuration" = CLDC-1.0 dan "Device Profile" = MIDP-1.0 (versi terkecil yang dapat digunakan dalam semua selular yang support J2ME)
7. Setelah semua selesai (tempate telah dibuat), jalankan aplikasi ini dengan menekan tombol F6 (Run Main Project).
8. Lalu project ini akan dikompile dan emulator akan keluar, gunakan mouse untuk mengoperasikan emulator tersebut, dengan menekan nekan tombol keypad dalam emulator tersebut mirip seperti selular biasa.
9. Pada saat ini, aplikasi "Hello World" kita telah selesai dibuat dan bisa langsung di tes pada selular yang sebenarnya.
Untuk testing langsung ke dalam selular, yang diperlukan tidaknya banyak, hanya:
1. Selular phone yang mendukung J2ME (setidaknya MIDP v1).
2. Alat untuk memindahkan aplikasi (.JAR dan .JAD) yang sudah dibuat kedalam selular, dapat berupa kabel data, infrared, bluetooth atau card reader/writer jika selular yang ingin digunakan sebagai test device memiliki slot memory external, seperti MMC, MemoryStick dan lainnya. Cara pemindahan aplikasi J2ME sama seperti cara mengisi ringtone, image dan lainnya.
3. Software untuk memindahkan aplikasi J2ME ke dalam selular, bisa menggunakan aplikasi yang dibuat oleh perusahaan lain (bukan buatan vendor selular tersebut), seperti MobiMB yang berukuran kecil, mudah dan cepat.
Dalam artikel ini, selular yang digunakan sebagai test adalah Nokia 6015 (memakai kabel data USB) dan Nokia 9500 (memakai card reader/writer untuk mengkopi file .JAR dan .JAD ke dalam MMC). File file yang perlu ditransfer kedalam selular adalah file .JAR (dan .JAD jika diperlukan) yang berada dalam direktori "DIST", lokasi direktori ini telah ditentukan pada langkah ke 5.
Kita telah selesai membuat aplikasi J2ME "Hello World", untuk merubah text atau menambah objek objek lainnya seperti TextBox, RadioBox, tombol- tombol menu dan lainnya dapat kita lakukan dalam Netbean, juga tanpa perlu menuliskan source-code karena Netbean v4.1 sudah memiliki fungsi yang cukup bagus dan mudah dengan drag-and-drop mirip seperti programming Visual Basic dan lainnya yang hanya memerlukan perubahan pada properti-properti objek tersebut jika diperlukan seperti kata-kata nya, lebar tingginya dan lain lain.
Memang aplikasi yang telah dibuat ini tidak begitu berguna, tapi bagi para programmer yang telah menguasai bahasa pemrograman Java maka tidaklah sulit untuk membuat aplikasi atau game game untuk selular yang mungkin bisa dengan mudah dijual kepada perusahaan perusahaan mobile content aggregator karena bisnis mobile content cukup lumayan saat ini.
Pilihan J2ME untuk membuat aplikasi/game selular sangat bagus, karena ukuran file nya kecil (file JAR Hello World yang telah kita buat ini hanya kurang lebih 1 kilobyte saja), bahasa Java relatif lebih mudah dipelajari dibanding C/C++ untuk Symbian, Palm, Pocket PC dan Linux, dan alasan yang terakhir adalah software IDE untuk J2ME versi sekarang ini sangat baik dan lebih mudah digunakan.
Kemungkinan jika semua langkah yang dijelaskan diatas dicoba dengan sama persis oleh para pemula, maka mungkin hanya membutuhkan waktu kurang dari 10 menit hingga selesai dimasukan dalam selular, pihak editor hanya membutuhkan kurang dari 3 menit untuk menyelesaikannya.
Sumber : Cellular Diary
Membuat aplikasi J2ME tidak memerlukan banyak software yang rumit atau besar, salah satu software yang pasti diperlukan adalah J2SE SDK/JDK, dalam J2SE SDK/JDK ini terdapat runtime dan library untuk program Java secara umum termasuk juga untuk J2ME, pada saat artikel ini ditulis telah ada J2SE SDK v1.4.2.
Untuk menulis source-code J2ME, maka kita memerlukan sebuah J2ME IDE (integrated development environment),
ada beberapa pilihan IDE yang diantaranya adalah Netbean, Sun One Java Studio Mobility, CodeWarrior dan notepad (atau text editor lainnya), untungnya semua software IDE yang disebutkan ini dapat di download gratis di website resmi masing masing perusahaan, jadi untuk membuat program J2ME maka pihak developer tidak perlu mengeluarkan uang sama sekali untuk membeli software IDE.
Pada artikel ini yang diulas adalah IDE dari Netbean v4.1 dengan tambahan Netbean Mobility Pack v4.1, tambahan ini diperlukan untuk membuat aplikasi J2ME, karena jika hanya dengan Netbean v4.1 hanya dapat membuat aplikasi Java saja, Netbean Mobility Pack adalah module-module aplikasi J2ME dan emulator device untuk testing dalam PC. IDE lainnya boleh dicoba tapi dianjurkan memakai Netbean v4.1 karena versi ini sangat mudah dioperasikan dan dirasakan cukup cepat dibanding IDE lainnya dalam hal loading, compiling, running dan debugging.
Langkah yang dilakukan oleh editor untuk memulai pembuatan aplikasi J2ME adalah:
1. Install J2SE SDK v1.4.2 (50MB)
2. Install Netbean v4.1 (47MB)
3. Install Netbean Mobility Pack v4.1 (18MB)
4. Jalankan Netbean v4.1, buat projek baru dan pilih kategori "Mobile" dan tipe projek "Mobile Application"
5. Pilih lokasi tempat menyimpan file-file projek ini, "Set as Main Project" dan "Create Hello MIDlet" jangan dirubah (tercentang)
6. Pada halaman "Platform selection" pilih "Device Configuration" = CLDC-1.0 dan "Device Profile" = MIDP-1.0 (versi terkecil yang dapat digunakan dalam semua selular yang support J2ME)
7. Setelah semua selesai (tempate telah dibuat), jalankan aplikasi ini dengan menekan tombol F6 (Run Main Project).
8. Lalu project ini akan dikompile dan emulator akan keluar, gunakan mouse untuk mengoperasikan emulator tersebut, dengan menekan nekan tombol keypad dalam emulator tersebut mirip seperti selular biasa.
9. Pada saat ini, aplikasi "Hello World" kita telah selesai dibuat dan bisa langsung di tes pada selular yang sebenarnya.
Untuk testing langsung ke dalam selular, yang diperlukan tidaknya banyak, hanya:
1. Selular phone yang mendukung J2ME (setidaknya MIDP v1).
2. Alat untuk memindahkan aplikasi (.JAR dan .JAD) yang sudah dibuat kedalam selular, dapat berupa kabel data, infrared, bluetooth atau card reader/writer jika selular yang ingin digunakan sebagai test device memiliki slot memory external, seperti MMC, MemoryStick dan lainnya. Cara pemindahan aplikasi J2ME sama seperti cara mengisi ringtone, image dan lainnya.
3. Software untuk memindahkan aplikasi J2ME ke dalam selular, bisa menggunakan aplikasi yang dibuat oleh perusahaan lain (bukan buatan vendor selular tersebut), seperti MobiMB yang berukuran kecil, mudah dan cepat.
Dalam artikel ini, selular yang digunakan sebagai test adalah Nokia 6015 (memakai kabel data USB) dan Nokia 9500 (memakai card reader/writer untuk mengkopi file .JAR dan .JAD ke dalam MMC). File file yang perlu ditransfer kedalam selular adalah file .JAR (dan .JAD jika diperlukan) yang berada dalam direktori "DIST", lokasi direktori ini telah ditentukan pada langkah ke 5.
Kita telah selesai membuat aplikasi J2ME "Hello World", untuk merubah text atau menambah objek objek lainnya seperti TextBox, RadioBox, tombol- tombol menu dan lainnya dapat kita lakukan dalam Netbean, juga tanpa perlu menuliskan source-code karena Netbean v4.1 sudah memiliki fungsi yang cukup bagus dan mudah dengan drag-and-drop mirip seperti programming Visual Basic dan lainnya yang hanya memerlukan perubahan pada properti-properti objek tersebut jika diperlukan seperti kata-kata nya, lebar tingginya dan lain lain.
Memang aplikasi yang telah dibuat ini tidak begitu berguna, tapi bagi para programmer yang telah menguasai bahasa pemrograman Java maka tidaklah sulit untuk membuat aplikasi atau game game untuk selular yang mungkin bisa dengan mudah dijual kepada perusahaan perusahaan mobile content aggregator karena bisnis mobile content cukup lumayan saat ini.
Pilihan J2ME untuk membuat aplikasi/game selular sangat bagus, karena ukuran file nya kecil (file JAR Hello World yang telah kita buat ini hanya kurang lebih 1 kilobyte saja), bahasa Java relatif lebih mudah dipelajari dibanding C/C++ untuk Symbian, Palm, Pocket PC dan Linux, dan alasan yang terakhir adalah software IDE untuk J2ME versi sekarang ini sangat baik dan lebih mudah digunakan.
Kemungkinan jika semua langkah yang dijelaskan diatas dicoba dengan sama persis oleh para pemula, maka mungkin hanya membutuhkan waktu kurang dari 10 menit hingga selesai dimasukan dalam selular, pihak editor hanya membutuhkan kurang dari 3 menit untuk menyelesaikannya.
Sumber : Cellular Diary
Senin, 08 Juni 2009
Tool Tool Buat Cracking
Debuggers
OllyDbg modified :
OllyDbg – BoomBox
http://rapidshare.com/files/25394210/request.php_3
OllyDbg – Chinese
http://rapidshare.com/files/25394358/request.php_554
OllyDbg – CiM’s
http://rapidshare.com/files/25394505/request.php_1206
OllyDbg – Diablo’s
http://rapidshare.com/files/25395171/request.php_2
http://letitbit.net/download/6bb575376676/d2k2.ollydbg.public2008-updated.rar.html ==new==
OllyDbg – ExeCryptor
http://rapidshare.com/files/25395311/request.php_553
OllyDbg – Hacnho’s
http://rapidshare.com/files/25395639/request.php_4
OllyDbg – OllyICE
http://rapidshare.com/files/25395646/request.php_5
ollyice 2007.9.21
http://rapidshare.com/files/60720683/OlyICE2007.9.21.rar
bigice 5
http://rapidshare.com/files/26791856/bigice5.zip
ollyice 2008.1.1
http://letitbit.net/download/b2ab7b731783/OllyICE-2008.1.1.rar.html
pass:reversengineering.wordpress.com
pass:reversengineering.wordpress.com
OllyICE v1.10
http://rapidshare.com/files/132790837/odbg110_OllyICE_v1.10_update.rar
OllyICE TheMida MOD. By EvOlUtIoN==new==
http://letitbit.net/download/90b2a3913809/OllyICE-TheMida-By-EvOlUtIoN.rar.html
http://rapidshare.com/files/138149196/OllyICE_TheMida_By_EvOlUtIoN.rar
OllyDbg – Shadow
http://rapidshare.com/files/25395640/request.php_6
OllyDbg – Unmodified!
http://rapidshare.com/files/25395641/request.php_1
OllyDbg-flyODBG
http://rapidshare.com/files/26789936/flyjnop790.zip
ollydbg – ricardo nar.
http://rapidshare.com/files/26791858/ricarcdon.zip
OllyDbg_SLV edition
http://rapidshare.com/files/26791862/slv.zip
OllyDbg -Arabic
http://rapidshare.com/files/26791864/ice1_3.zip
Ollydbg – xp
http://rapidshare.com/files/26771160/ollydbg_110_xp.rar
Ollydbg – greenstyle
http://rapidshare.com/files/26436069/ollydbg_Green_Style_20by_20jnop790.rar
OllyDbg – armadillo
http://rapidshare.com/files/34817803/odbg_204_20armadillo_20with_20tools.zip
OllyDbg – xp+ dct
http://rapidshare.com/files/34821367/ODbg_20xp_20DCT.zip
OllyDbg – ADO
http://rapidshare.com/files/34821368/ODbgADO.zip
OllyDbg – SND
http://rapidshare.com/files/34821374/ODbgSnD.zip
OllyDbg -D2K2
http://rapidshare.com/files/34821377/ODbgD2k2.zip
OllyDbg – DeFixed
http://rapidshare.com/files/39044055/DeFixed_Edition.rar
OllyDbg – DeFixed v2 (foff)
http://rapidshare.com/files/60718378/DeFixed_Edition_v2.rar
OllyDbg – ExeCryptor
http://rapidshare.com/files/39851301/exec.olly.zip
olly bronco (mod. for execryptor )
http://rapidshare.com/files/66345462/OllyDbg_v1.10_Bronco.rar
olly YPOGEiOS DOX DiViSiON
http://rapidshare.com/files/66345700/YGS-DOX_OllyDBG.v1.10.Mod-YPOGEiOS.rar
OllyDbg’ – Snd version all plugins and olly patched :
http://rapidshare.com/files/44123914/0_1_1_YDbg_Beta_Full.7z
the 0dbg for Themida/WinLicense V1.9.3.0
http://rapidshare.com/files/50611549/The0DBG.exe
HanOlly
http://rapidshare.com/files/64369450/odbg110__HanOlly_edition_for_themida_1.9.rar
ollydbg modified for themida 1.9.5
http://rapidshare.com/files/65716863/O_ll_y_Dbg_modify_for_themida1.9.5.EXE
ollydbg modified for themida and execryptor
http://letitbit.net/download/d35cd7115999/RAMODBG.rar.html
ollydng Sabre Gold
DarkOlly
http://rapidshare.com/files/137296680/DarkOlly.7z
OllyDbg 1.10 – kamal
http://letitbit.net/download/9e844d493204/OllyDbg-1.10-by-kamal.rar.html
OllyDbg v1.10 LifeODBG v1.4
http://letitbit.net/download/686a95302760/OllyDbg-v1.10-LifeODBG-v1.4.rar.html
OllyDBG The_Best_version==new==
http://rapidshare.com/files/142544485/OllyDBG_The_Best_version.rar
http://letitbit.net/download/ffb745506367/OllyDBG-The-Best-version.rar.html
ollydbg moded by DeRoX ==new==19 nov 2008
http://letitbit.net/download/9cde79762956/odbg110-Olly-DRX-Lite.rar.html
OllyDbg 2
OllyDbg 2 2a 20 oct 2007
http://rapidshare.com/files/64369705/ollydbg_2a-_20_oct07.exe
OllyDbg v2.00 Alpha 4
http://letitbit.net/download/a51bdc740372/OllyDbg-v2.00-Alpha-4.zip.html
OllyDbg v2.00 Alpha Sabre-Gold==new==
http://letitbit.net/download/357163436792/OllyDbg-v2.00-Alpha-Sabre-Gold.rar.html
oLLYdbg 2.00 g==new==
http://letitbit.net/download/0768f7669997/odbg200g.zip.html
ollydbg1.1 BY INREv team==new==
http://letitbit.net/download/fc3c1941207/ollydbg1.1-beta2-INRev.rar.html
http://letitbit.net/download/6faed3180832/odbg1.10-beta1–INRev.rar.html
> all patches for OllyDbg 1.x<
http://rapidshare.com/files/35977772/OLLYDBG_1.10_all_patches_.rar
note:
AFTER DOWNLOAD CHANGE NAME TO*.RAR OR *.ZIP
=================
Debugging Tools for Windows
dbg X86
http://www.microsoft.com/whdc/devtools/debugging/installx86.mspx
=================
SoftIce
98
http://rapidshare.com/files/50615930/Sic_v4.2.7_RC1_9x__IceExt_v0.7.part1.rar
http://rapidshare.com/files/50615933/Sic_v4.2.7_RC1_9x__IceExt_v0.7.part2.rar
http://rapidshare.com/files/50615934/SoftICE_20v4.3.2.2485.rar
xp
http://rapidshare.com/files/50615935/SoftIce_20v4.2.7_20RC1_20XP.exe
=================
Syser Debugger
Syser Debugger 1.92
http://rapidshare.com/files/42710603/download.php
Syser Debugger 1.93
http://rapidshare.com/files/48708302/download.php
Syser DebuggeR 1.97.1900.1016
http://rapidshare.com/files/119028937/Sys.Debug.v1.97.1900.1016.zip
Syser.Debugger.v1.97.1900.1038
http://rapidshare.com/files/131394971/Syser.Debugger.v1.97.1900.1038.zip
Syser Debugger 1.99.1900.1095 ==new==
http://letitbit.net/download/2f637f902443/SYSKERNDEBUG.1.99.1900.1095.rar.html
=================
Immunity Debugger
ImmunityDebugger v 1.0
http://debugger.immunityinc.com/download/ImmunityDebugger_setup.exe
or
http://rapidshare.com/files/47096385/ImmunityDebugger_setup.exe
ImmunityDebugger v 1.5 FULL (SCRIPT+PLUGIN)
part 1 & 2:
http://rapidshare.com/files/138160039/ImDbg.v1.5.7z.001
http://rapidshare.com/files/138158243/ImDbg.v1.5.7z.002
PASS:http://reversengineering.wordpress.com/debuggers/
ImmunityDebugger 1.73 RemoveAD KuNgBiM ==new 19 nov 2008 added== hot
http://rapidshare.com/files/165317164/ImmunityDebugger_1.73_RemoveAD_KuNgBiM.7z.002
http://rapidshare.com/files/165319412/ImmunityDebugger_1.73_RemoveAD_KuNgBiM.7z.001
=================
IDA Pro
IDA Pro Advanced v5.1.0.899
http://letitbit.net/download/555d66375926/IDAProAdvancedv5.1.0.899.rar.html
Fix
http://letitbit.net/download/3df899307180/IDAProAdvancedv5.1.0.899Fix.rar.html
DataRescue IDA Pro Advanced v5.1.0.899 + SDK + FiX
http://letitbit.net/download/077cd4773868/DataRescue.IDA.Pro.Advanced.v5.1.0.899.rar.html
IDA PRO 5.1 SDK
http://letitbit.net/download/a91b81999543/IDA-5.1-SDK.part02.rar.html
http://letitbit.net/download/e5e2e4967183/IDA-5.1-SDK.part01.rar.html
Datarescue ida pro advanced v5.1 windows patch
LAN patch
Key blacklist patch
Russian IDA data file read patch
http://letitbit.net/download/9a8fec832094/datarescue.ida.pro.advanced.v5.1.windows-patch.rar.html
IDA Pro v5.20 Advanced Full MegaPack
by cracklab
http://letitbit.net/download/b96428300403/download.php-action-get-n-MjE1.html
after download rename it to “IDA Pro v5.20 Advanced Full MegaPack.rar”
IDA Pro 5.2 addons
idsutil5.20
Flair5.10
http://letitbit.net/download/f09e75790522/IdaPro5.2-addons.rar.html
DataRescue IDA Pro Advanced v5.2 SDK
http://letitbit.net/download/85acc3208403/idapro52sdk.part02.rar.html
http://letitbit.net/download/307d35980633/idapro52sdk.part01.rar.html
=================
Zeta Debugger
Zeta Debugger v1.4
http://letitbit.net/download/b06dd5445683/Zeta.Debugger.v1.4-full.zip.html
Zeta Debugger v1.5==new==
http://letitbit.net/download/e0881a39387/zd1.5-setup.zip.html
=================
Linux Debugger
EDB Linux Debugger 0.8.12
http://www.codef00.com/projects/debugger-0.8.12.tgz
0.9.1
http://www.codef00.com/projects/debugger-0.9.1.tgz
0.9.2 released 2008-07-29
http://www.codef00.com/projects.php#Debugger
0.9.4 2008-08-12==new==
http://www.codef00.com/projects/debugger-0.9.4.tgz
=================
java Debugger
JDebugTool Pro v4.1.1==new==
http://letitbit.net/download/baf0a2105543/JDebugTool-Pro-v4.1.1.rar.html
http://rapidshare.com/files/137998716/JDebugTool_Pro_v4.1.1.rar
pass:http://reversengineering.wordpress.com
=================
other debuggers
Obsidian – Non-intrusive Debugger + src ==new==
http://letitbit.net/download/e7fa3b610314/Obsidian–src.rar.html
VB Debugger [source code] + compiled with VB 6==new==
http://letitbit.net/download/f2e228167354/vb-debug-src.7z.html
MiniDBG with source==new==
Rabu, 03 Juni 2009
Transfer Aktivasi Windows
- Setelah windows original kita aktivasi , Simpan file berikut ke tempat yang lebih aman (e.g bisa di burn di cd ) Yaitu file wpa.dbl dan wpa.bak yang terpenting adalah wpa.dbl
- Untuk restore aktivasi ( mis : setelah install ulang ) setelah windows terinstall masuk ke safe mode ( Nyalakan terus tekan F8--->pilih Safe Mode )
- Buka Explorer
- Arahkan ke C:\Windows\System32
- Cari File wpa.dbl dan wpa.bak, rename (mis wpa.dbl.new dan wpa.bak.new)
- Copykan file wpa.dbl dan wpa.bak ke yang telah kita simpan (dari windows yang sudah teraktivasi) ke C:\Windows\System32
- Restart dan Masuk ke windows dengan normal
Langganan:
Postingan (Atom)


